
Gluten-Free Pita Bread
Table of Contents
Table of Contents
Remember the joy of tearing into warm, pillowy pita bread? For those living gluten-free, that simple pleasure often feels like a distant memory. But what if you could recreate that perfect pocket of deliciousness right in your kitchen, without the gluten?
Whether you’re dealing with celiac disease, gluten sensitivity, or simply choosing a gluten-free lifestyle, saying goodbye to traditional pita bread doesn’t mean giving up on those soft, pocketable circles of joy. This recipe delivers the authentic taste and texture you’ve been missing, and the best part? It’s surprisingly quick and simple to make!
Understanding Gluten-Free Baking Challenges
Traditional pita bread gets its characteristic pocket from the stretchy gluten proteins that trap steam during baking, causing the dough to puff dramatically. When removing gluten from the equation, recreating this effect becomes tricky.
Many gluten-free breads end up dense, crumbly, or just plain disappointing. This recipe tackles these challenges head-on by using a carefully balanced blend of flours and binding agents that mimic gluten’s elasticity and strength.
The science is simple: different starches and flours combine to create structure, while xanthan gum or psyllium provides the binding power usually supplied by gluten. The result? A pita that puffs, pockets, and pleases even the most discerning bread lovers.
Essential Ingredients for Perfect Gluten-Free Pita Bread
Before diving into the recipe, understanding your ingredients is crucial for success. Each component plays a specific role in recreating the texture and flavor of traditional pita.
Flour Power: Choosing the Right Gluten-Free Flours
Unlike conventional bread that relies on wheat flour, gluten-free pita requires a thoughtful blend of alternative flours. Each contributes unique properties:
- Rice flour provides structure and neutrality
- Tapioca starch adds stretch and chewiness
- Potato starch holds moisture and creates tenderness
- Sorghum flour contributes wholesome flavor and nutrition
This balanced combination creates a dough that’s workable, elastic, and capable of forming those coveted pockets.
Key Binding Agents and Leaveners
Without gluten’s natural binding power, you’ll need reinforcements:
- Xanthan gum works as the glue that holds everything together
- Active dry yeast creates rise and those characteristic bubbles
- Apple cider vinegar helps activate the yeast and improves the overall texture
These ingredients work together to create structure in your gluten-free pita bread, ensuring it doesn’t fall apart when handled.
Equipment You’ll Need
Successful gluten-free pita bread doesn’t require fancy equipment, but a few key tools will make your baking experience smoother:
- Measuring cups and spoons (accuracy matters in gluten-free baking!)
- Large mixing bowl
- Kitchen thermometer (for yeast activation)
- Rolling pin
- Baking sheet or pizza stone
- Mixing spoon or stand mixer
- Clean kitchen towels
If you’re on a budget, most of these items have alternatives. A wine bottle can substitute for a rolling pin, and while a pizza stone creates the best results, a preheated baking sheet works well, too.
Step-by-Step Gluten-Free Pita Bread Recipe
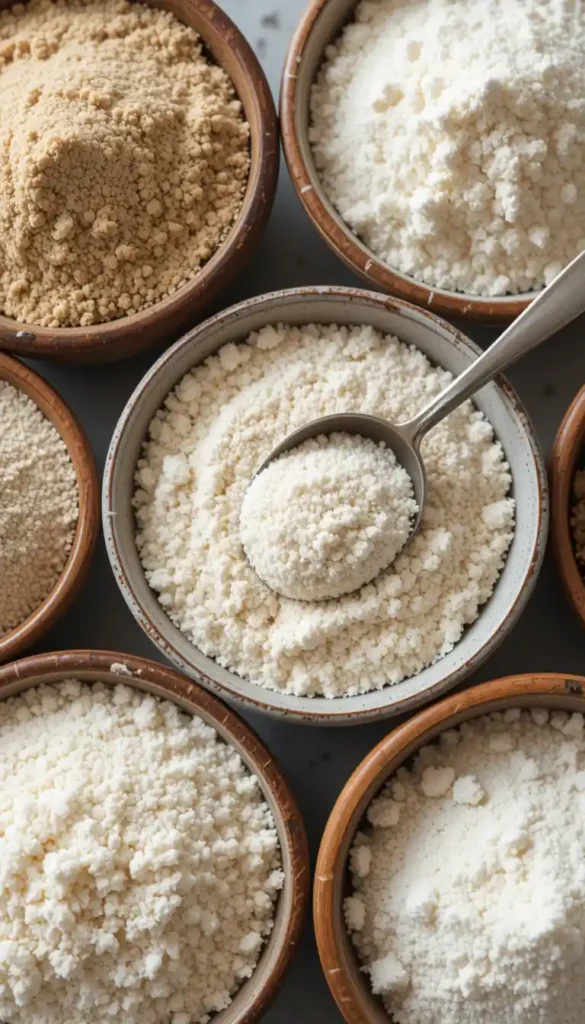
The Perfect Flour Blend
Start by creating your flour blend. While you can purchase pre-made gluten-free flour mixes, a custom blend offers better results for specialty breads like pita.
| Ingredient | Amount | Purpose |
|---|---|---|
| Rice flour | 1 cup | Base structure |
| Tapioca starch | 1/2 cup | Flexibility and chew |
| Potato starch | 1/4 cup | Moisture retention |
| Sorghum flour | 1/4 cup | Nutty flavor |
| Xanthan gum | 2 tsp | Binding |
Simply whisk these ingredients together until thoroughly combined. Store any unused blend in an airtight container for future baking.
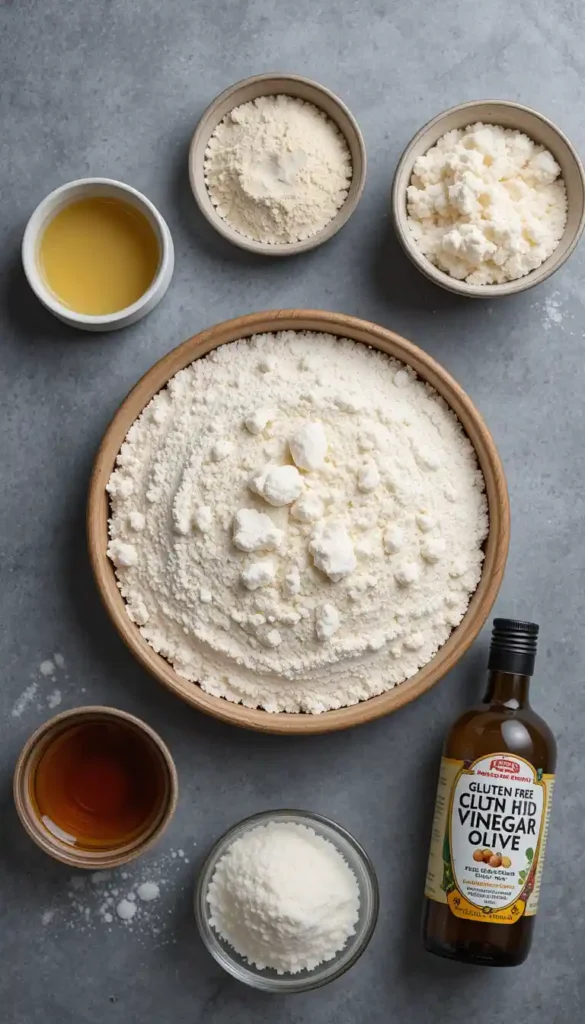
Full Ingredients List
Now that you understand the components, here’s everything you’ll need to make eight medium-sized gluten-free pita breads:
| Ingredient | Amount | Notes |
|---|---|---|
| Gluten-free flour blend | 2 cups | See blend above |
| Active dry yeast | 2 1/4 tsp | One standard packet |
| Sugar | 1 tsp | To activate yeast |
| Warm water | 1 cup | 110-115°F |
| Salt | 1 tsp | Enhances flavor |
| Olive oil | 2 tbsp | For dough elasticity |
| Apple cider vinegar | 1 tsp | Improves rise |
Mixing and Rising Process
- Activate the yeast: Combine warm water (110-115°F), sugar, and yeast in a small bowl. Gently stir the mixture and allow it to sit for 5–10 minutes until it becomes foamy. If your mixture doesn’t foam, your yeast might be inactive—start again with fresh yeast.
- Combine dry ingredients: In a large bowl, whisk together your gluten-free flour blend and salt until evenly distributed.
- Mix wet and dry: Pour the activated yeast mixture, olive oil, and apple cider vinegar into the dry ingredients. Mix until a sticky dough forms. Unlike regular dough, gluten-free versions appear wetter and stickier—this is normal!
- Knead the dough: Turn the dough onto a lightly floured surface (use your gluten-free blend) and knead gently for 2-3 minutes. Rather than aggressive kneading as with wheat dough, think of this as more of a gentle shaping process to create a smooth surface.
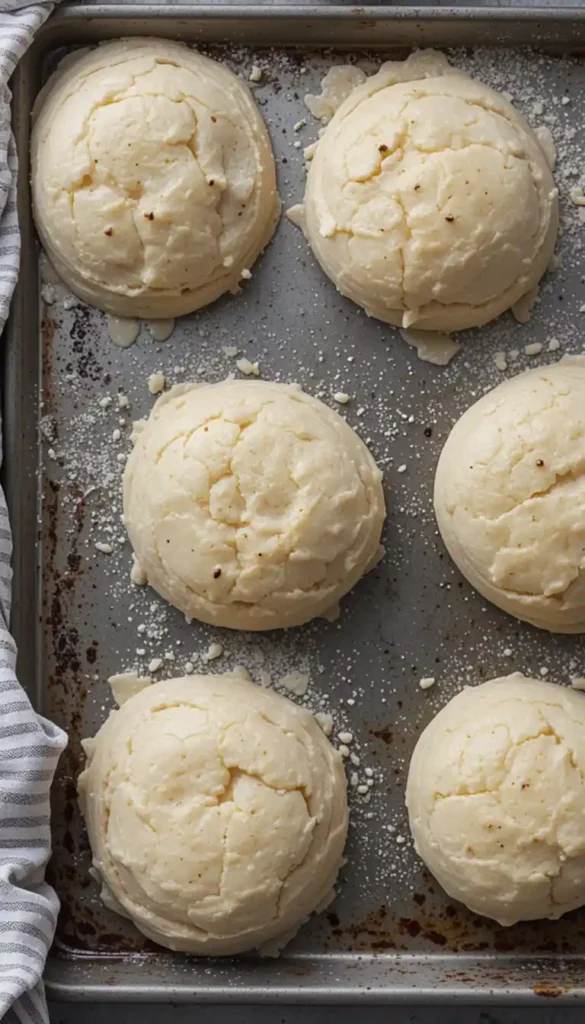
- First rise: Place the dough in an oiled bowl, cover with a damp towel, and let rise in a warm spot for 45-60 minutes. The dough won’t double in size like wheat dough, but it should expand noticeably.
Shaping and Baking Your Gluten-Free Pita Bread
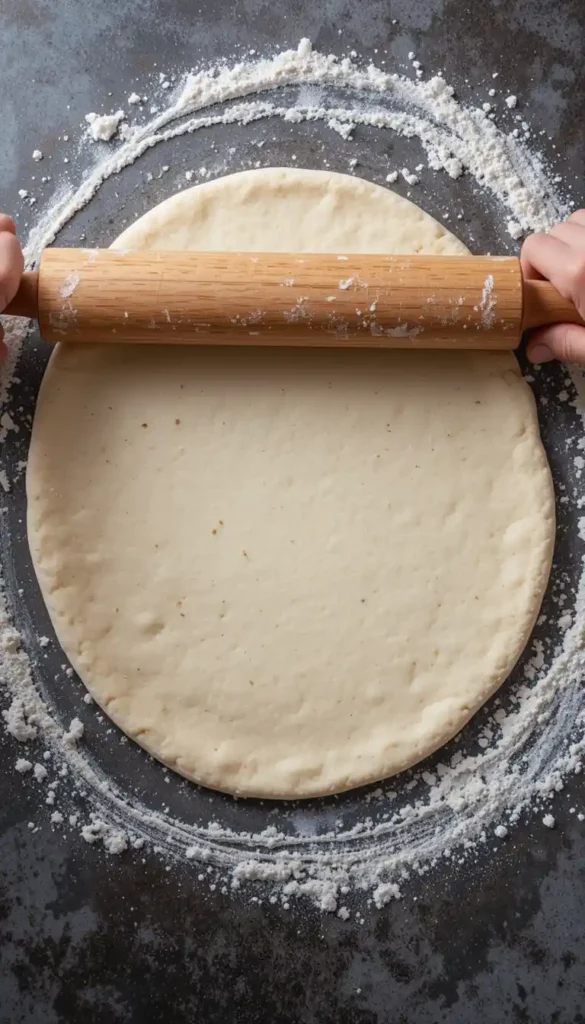
- Divide the dough: After it has risen, gently punch down the dough and divide it into 8 equal portions. Roll each portion into a ball.
- On a lightly floured surface, roll each dough ball into a circle approximately 1/4 inch thick to form the pitas. Aim for even thickness throughout—this ensures proper pocketing.
- Second rise: Place your shaped pitas on baking sheets, cover lightly with oiled plastic wrap, and let rest for 15 minutes while your oven preheats.
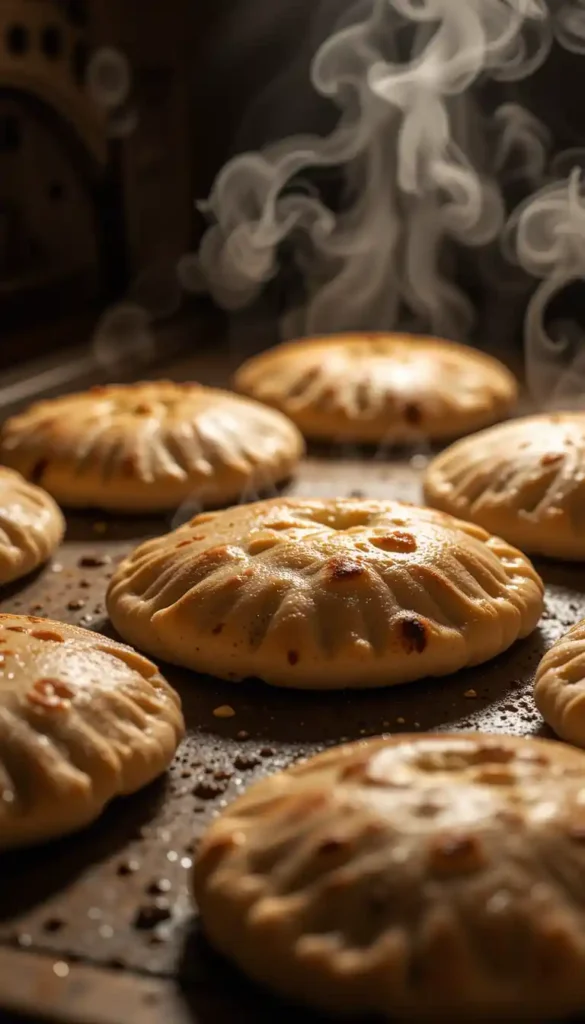
- Baking methods:
- Conventional oven: Preheat to 450°F with a baking sheet or pizza stone inside. When hot, carefully transfer pitas onto the preheated surface and bake for 3-4 minutes until puffed.
- Pizza stone method: Preheat your stone for at least 30 minutes at 450°F. Slide pitas directly onto the stone and bake until puffed, about 3 minutes.
- Stovetop method: Heat a heavy skillet over medium-high heat until it’s fully preheated. Cook pitas for 1-2 minutes per side until bubbles form and they puff up.
- Cooling: Remove pitas from the heat source and immediately wrap them in a clean kitchen towel. This traps steam and keeps them soft while cooling.
Troubleshooting Common Issues
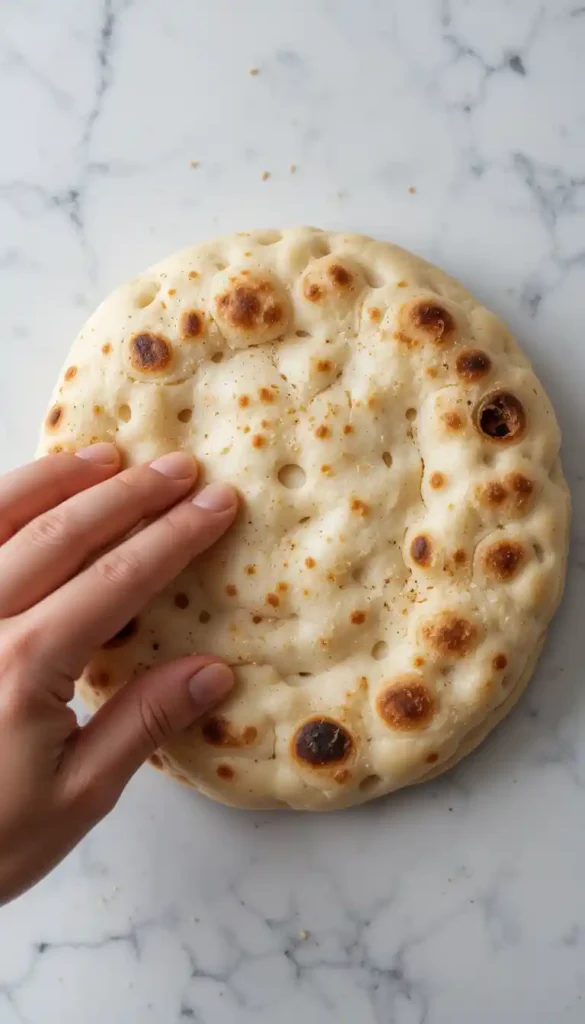
Why Isn’t My Gluten-Free Pita Bread Pocketing?
If your pitas aren’t forming pockets:
- Temperature issues: Your oven might not be hot enough. Pita bread needs intense heat to create the steam that forms pockets.
- Dough thickness: Too thick or too thin can prevent proper pocketing. Aim for a consistent 1/4 inch thickness.
- Moisture levels: If your dough feels dry, add a tablespoon of water; if too wet, dust with more flour blend.
Texture Problems and Solutions
- Too dry and crumbly: Add a tablespoon of olive oil to your next batch for more moisture.
- Too dense and heavy: Try reducing the amount of flour or adding a bit more water to achieve a slightly stickier dough.
- Not rising properly: Ensure your yeast is fresh and active and that your water temperature is correct (too hot kills yeast, too cold won’t activate it).
Storage and Reheating Tips
Gluten-free breads typically have a shorter shelf life than its wheat counterpart, but proper storage can extend freshness:
- Counter storage: Wrap cooled pitas in a clean towel and place in an airtight container. Consume within 1-2 days.
- Refrigeration: Store in an airtight container with paper towels layered between each pita to absorb moisture. Good for up to 5 days.
- Freezing: Wrap individually in plastic wrap, then aluminum foil, and freeze for up to 3 months.
To reheat:
- Microwave: Sprinkle with water, wrap in a damp paper towel, and heat for 10-15 seconds.
- Oven: Wrap in foil and warm at 300°F for 5-7 minutes.
- Stovetop: Lightly dampen the surface and heat in a dry skillet for 30 seconds per side.
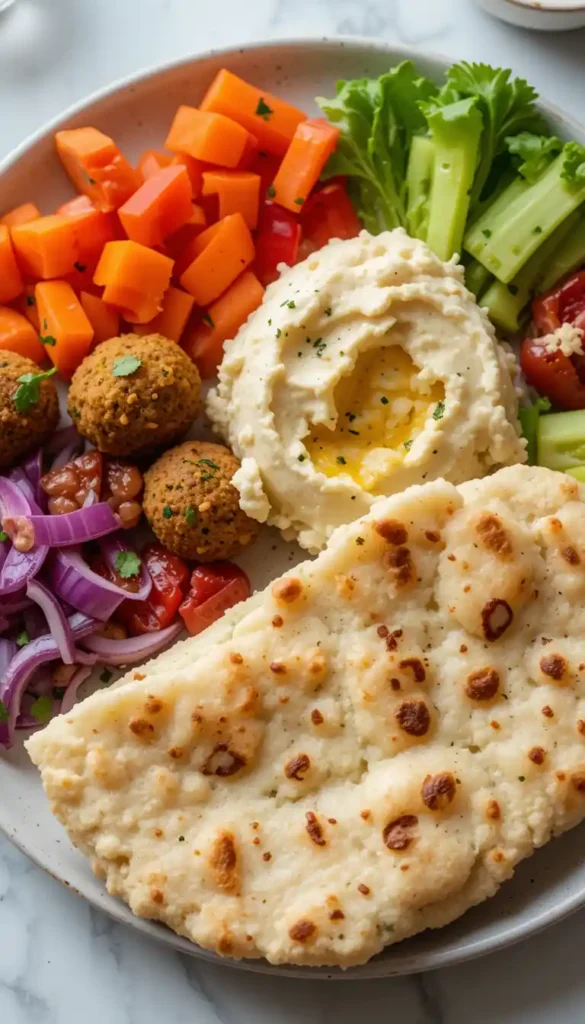
Delicious Ways to Serve Your Gluten-Free Pita Bread
Mediterranean-Inspired Dishes
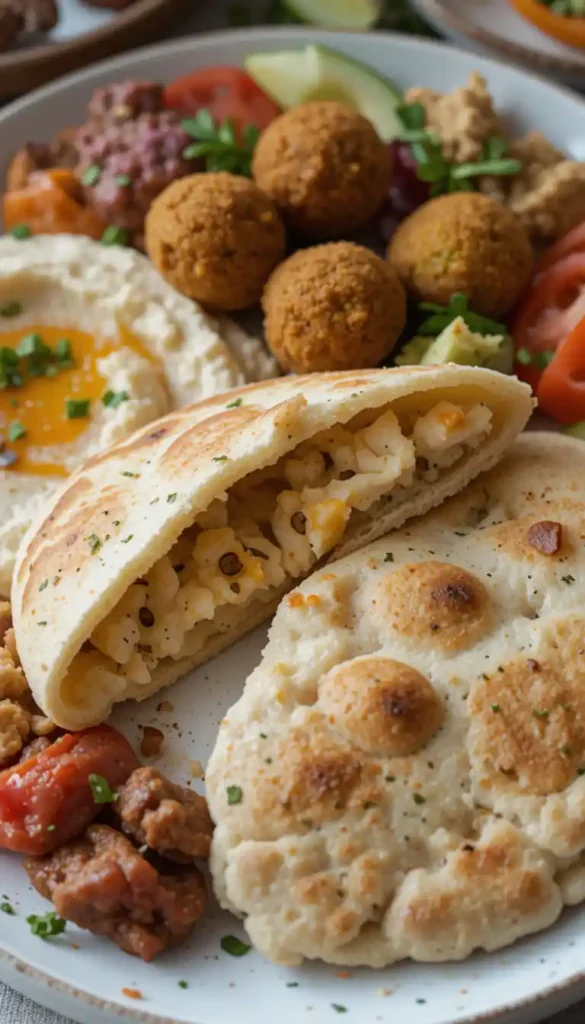
Your fresh gluten-free pita bread pairs perfectly with:
- Smooth, creamy hummus topped with olive oil and paprika
- Falafel wrapped with tahini sauce and crisp vegetables
- Greek salad with cucumber, tomato, feta, and olives
Creative Fusion Ideas
Think beyond traditional uses:
- Breakfast pockets filled with scrambled eggs and avocado
- Mini pita pizzas topped with your favorite sauce and toppings
- Dessert pitas spread with Nutella and sliced strawberries
Nutritional Information and Benefits
Each pita contains approximately:
| Nutrient | Amount | % Daily Value |
|---|---|---|
| Calories | 120 | – |
| Carbohydrates | 24g | 8% |
| Protein | 2g | 4% |
| Fat | 2g | 3% |
| Fiber | 1g | 4% |
| Sodium | 195mg | 8% |
Beyond being gluten-free, these pitas offer several benefits:
- Lower in fat than many store-bought alternatives
- No preservatives when homemade
- Customizable to accommodate additional dietary needs
- Economical compared to specialty store-bought options
Conclusion
Creating your gluten-free pita bread at home isn’t just possible—it’s a rewarding experience that delivers results far superior to most store-bought options. The satisfaction of watching your dough puff into perfect pockets is matched only by the joy of biting into warm, fresh bread you made yourself.
Don’t be discouraged if your first batch isn’t perfect. Gluten-free baking is part science, part art, and even experienced bakers experiment with slight adjustments to achieve their ideal texture and flavor. Each kitchen, climate, and set of ingredients brings variables that might require small tweaks.
Remember that your homemade gluten-free pitas contain no preservatives or mysterious ingredients—just wholesome components you selected yourself. That’s something worth celebrating, one delicious bite at a time.
Have you tried making these gluten-free pita breads? We’d love to hear about your experience or any questions you may have—feel free to share them in the comments below! We’d love to see photos of your creations or hear about your favorite fillings and toppings.
Frequently Asked Questions
Can I make this gluten-free pita bread without xanthan gum?
Yes! Psyllium husk powder makes an excellent alternative. Substitute 2 tablespoons of psyllium husk powder for the 2 teaspoons of xanthan gum. You might need to add an extra tablespoon of water, as psyllium absorbs more moisture. Ground chia seeds or flaxseeds can also work in a pinch, though the texture will be slightly different.
How do I know if my gluten-free pita bread is thoroughly cooked?
Properly cooked gluten-free pita bread should puff up during baking and develop light golden spots on the surface. The internal temperature should reach about 200°F if you’re using a food thermometer. When tapped, the pita should sound hollow, indicating that moisture has been converted to steam, creating that sought-after pocket.
Can I make gluten-free pita bread without yeast?
While yeast provides the best flavor and texture for pita bread, you can substitute 1 tablespoon of baking powder mixed with 1 teaspoon of apple cider vinegar for the yeast. Skip the proofing step and add these directly to your flour mixture. The results won’t have the same depth of flavor, but you’ll still get serviceable pita bread in less time.
Why is my gluten-free pita bread not forming pockets?
Pocket formation depends on several factors working together. First, ensure your oven or cooking surface is properly preheated—intense heat creates the steam burst needed for pockets. Second, maintain consistent thickness when rolling (about 1/4 inch). Finally, make sure your dough has the right hydration level—it should feel tacky but not overly sticky or dry.
Is gluten-free pita bread healthier than regular pita?
Not necessarily. Gluten-free doesn’t automatically mean healthier—it simply means the product doesn’t contain gluten. Our homemade version avoids the excessive additives found in many commercial gluten-free products, making it a healthier choice for those who need to avoid gluten. If you don’t have celiac disease or gluten sensitivity, traditional pita made with whole-grain flour can be equally nutritious.
Can I make gluten-free pita bread in advance for a party?
Absolutely! Make them 1-2 days ahead and store them in an airtight container at room temperature. For longer storage, freeze immediately after cooling. To refresh before serving, lightly spritz with water and warm in a 300°F oven for 5 minutes. For the freshest experience, consider partially baking them ahead of time (about 2 minutes) and then finishing the baking just before serving.
Which brands of gluten-free flour work best for gluten-free pita bread?
Many bakers have had great success using reliable gluten-free flour blends like King Arthur Measure for Measure, Bob’s Red Mill 1-to-1, and Cup4Cup.Just be sure to add xanthan gum if the blend doesn’t already include it—check the ingredients list.
Now It’s Your Turn
Excited to try making this gluten-free pita bread? Whether you’re pairing it with dips or stuffing it with your favorite fillings, we’d love to hear how it turns out.
Leave a comment below and let us know how yours turned out—your tips or questions might help others, too.
If you loved the recipe, we’d appreciate it if you could rate it! Every rating helps us grow and continue sharing great gluten-free recipes.
Did you find it helpful? Feel free to share this post with your friends and family on social media or Pinterest!
Want more recipes like this? Check out:
Subscribe to our newsletter or follow us on Instagram @JoyfulCakes to get the latest gluten-free recipes straight to your inbox.
Did You Try Our Recipe?
Substitutes
Hi !
Has anyone tried brown rice flour instead of white? I would like more fiber content in this but would hate to try and waste ingredients if it doesn’t work. Thinking wet ingredients may have to increase with brown? I’m not sure.
Thanks! 😊
Response from joyful cakes
Brown rice flour works but is denser and absorbs more liquid. Increase wet ingredients by ~10-20% and test a small batch first.