
5 Easy Steps to Make Chocolate-Covered Oreos at Home
Table of Contents
Chocolate-covered Oreos are a treat loved by people of all ages. Whether celebrating a special occasion, indulging in a sweet craving, or looking for a fun DIY project with the kids, making these delicious cookies at home is simple and rewarding. There’s something magical about dipping a crisp Oreo into rich, creamy chocolate and watching it transform into a decadent treat.
In this guide, you’ll learn five easy steps to make chocolate-covered Oreos at home, plus helpful tips and tricks to ensure your homemade cookies turn out perfectly every time. Whether you’re a beginner in the kitchen or a seasoned baker, this step-by-step approach will help you create chocolate-covered Oreos that are tasty and look professional!
Let’s dive into the process of making these irresistible treats from scratch!
Step 1: Gather Your Ingredients
Before you begin, gather all the necessary ingredients. This recipe’s beauty is in its simplicity. You don’t need a long list of complex items; everything you need is likely already in your pantry.

Essential Ingredients
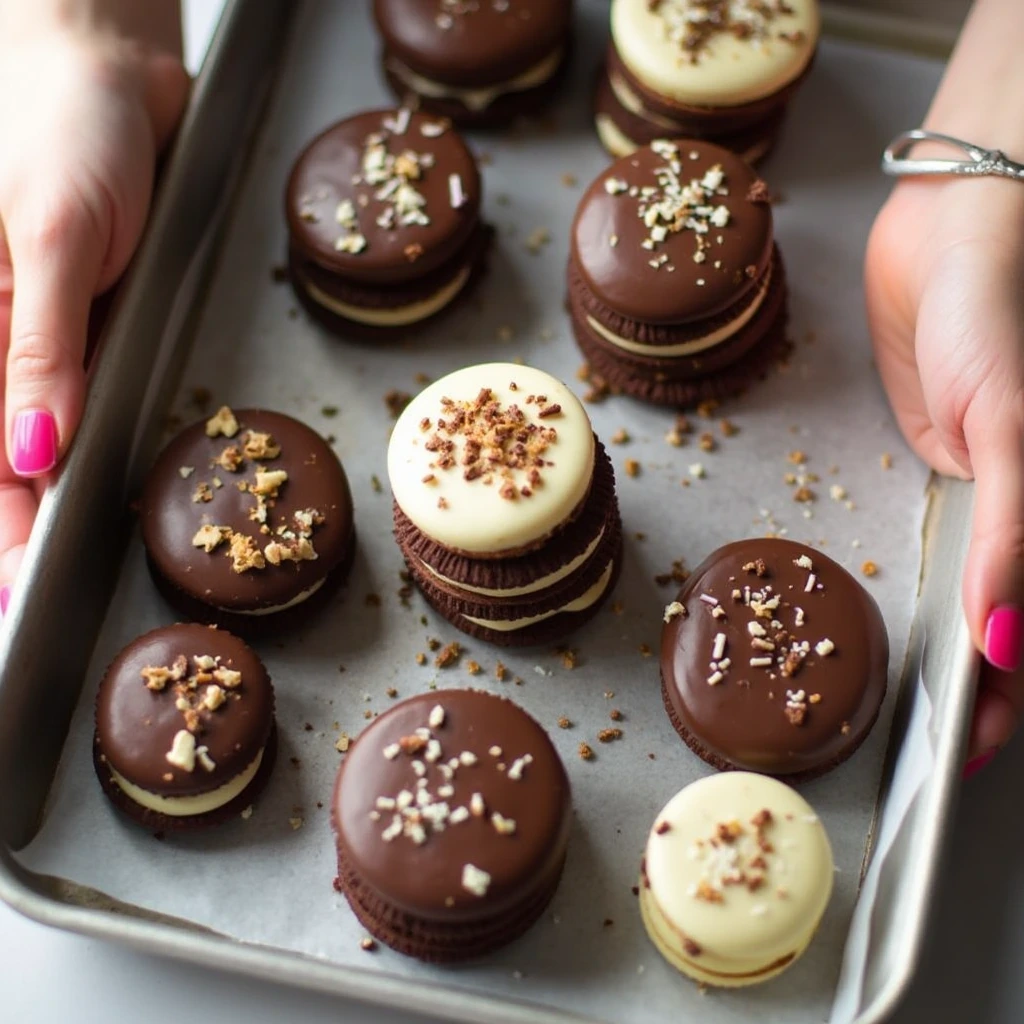
- Oreo Cookies: Of course, the main ingredient for chocolate-covered Oreos is the Oreo itself! You can use regular Oreos or try different flavors like Double Stuff, Peanut Butter, Mint, or Birthday Cake Oreos. The variety of Oreos you choose will affect the flavor profile of your final product.
- Chocolate: You can choose the type of chocolate you use. You can choose from milk chocolate, dark chocolate, or white chocolate. Each type of chocolate offers a different flavor and experience.
- Milk Chocolate: A sweet, creamy chocolate popular among most people.
- Dark Chocolate: Offers a more prosperous, slightly bitter taste that contrasts nicely with the sweetness of the Oreo.
- White Chocolate: Sweet and indulgent, with a creamy texture.
- Optional Toppings: Sprinkles, crushed nuts, crushed cookies, or candy pieces can add texture and flavor to your chocolate-covered Oreos. Be creative with your toppings, or skip this step for a clean, classic look.
- Coconut Oil (Optional): A tablespoon of coconut oil helps make the chocolate smoother and glossier. It also helps to thin the chocolate, making it easier to dip the Oreos evenly.
Ingredient List Table:
| Ingredient | Quantity | Notes |
|---|---|---|
| Oreo cookies | 1 package | Choose classic or any flavor |
| Chocolate (milk, dark, or white) | 2 cups | Your preferred type of chocolate |
| Optional toppings | As needed | Sprinkles, nuts, crushed candy |
| Coconut oil | 1 tbsp (optional) | To smooth chocolate coating |
Now that you’ve got your ingredients, let’s move on to the next step: preparing your workspace.
Step 2: Prepare Your Workspace and Tools
A clean and organized workspace is essential for a smooth process. You’ll need a few critical tools to make the chocolate-covered Oreos:
Tools You’ll Need:
- Microwave-safe bowl or double boiler: Used for melting the chocolate.
- Fork or dipping tool: To dip the Oreos into the melted chocolate.
- Parchment paper or wax paper: For cooling and setting the dipped Oreos.
- Large tray or baking sheet: Place the coated Oreos as they harden.
How to Set Up Your Workspace:
- Clear your counter: Make sure the surface is clean and clutter-free. You’ll need plenty of space to work.
- Prepare the cooling tray: Lay parchment paper or wax paper on a baking sheet or tray where the Oreos will cool and set.
- Set up your melting station: Place your bowl in the microwave or double boiler to begin melting the chocolate.
- Gather your tools: Have a fork or dipping tool ready to handle the Oreos. A fork works best as it lets you dip and quickly remove the cookie from the chocolate.
With everything set up, it’s time to melt the chocolate.
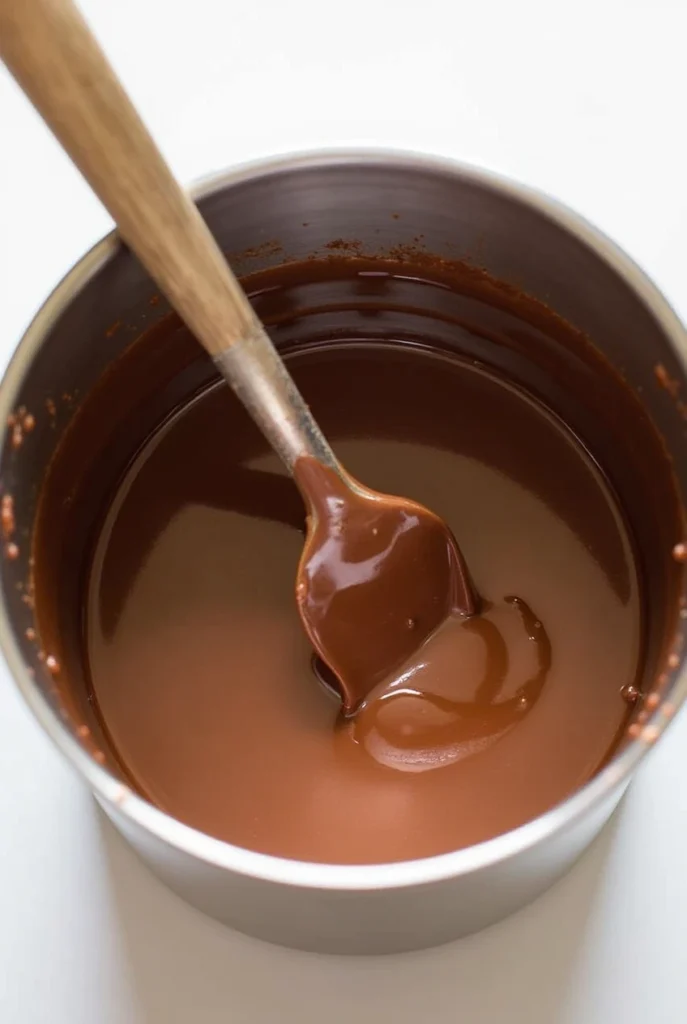
Step 3: Melt the Chocolate
Melting the chocolate is a crucial step in the process. If you overheat the chocolate, it may become too thick, and if you don’t melt it enough, it won’t coat the Oreos properly. Two primary methods for melting chocolate are the microwave method and the double boiler method.
Microwave Method:
- Chop the chocolate: Chop the chocolate into smaller pieces if using a block or use chocolate chips.
- Place in a microwave-safe bowl: Put the chopped chocolate or chips into a microwave-safe bowl.
- Microwave in short bursts: Heat the chocolate in the microwave in 30-second intervals. Stir after each interval to ensure the melting is even. Keep going until the chocolate is completely smooth and fully melted.
- Add coconut oil (optional): If the chocolate seems too thick, add a tablespoon of coconut oil to make it smoother and more fluid.
Double Boiler Method:
- Set up the double boiler: Fill a pot with a few inches of water and bring it to a gentle simmer. Place a heatproof bowl over the pot (ensuring the bowl doesn’t touch the water).
- Add the chocolate: Place it in the bowl and stir occasionally as it melts.
- Stir until smooth. Remove the bowl from the heat once the chocolate is fully melted.
- Add coconut oil (optional): Stir in coconut oil if desired for a smooth, glossy finish.
Whatever method you use, stir the chocolate well to avoid lumps. Now that your chocolate is ready, it’s time to dip the Oreos!
Step 4: Dip the Oreos in Chocolate
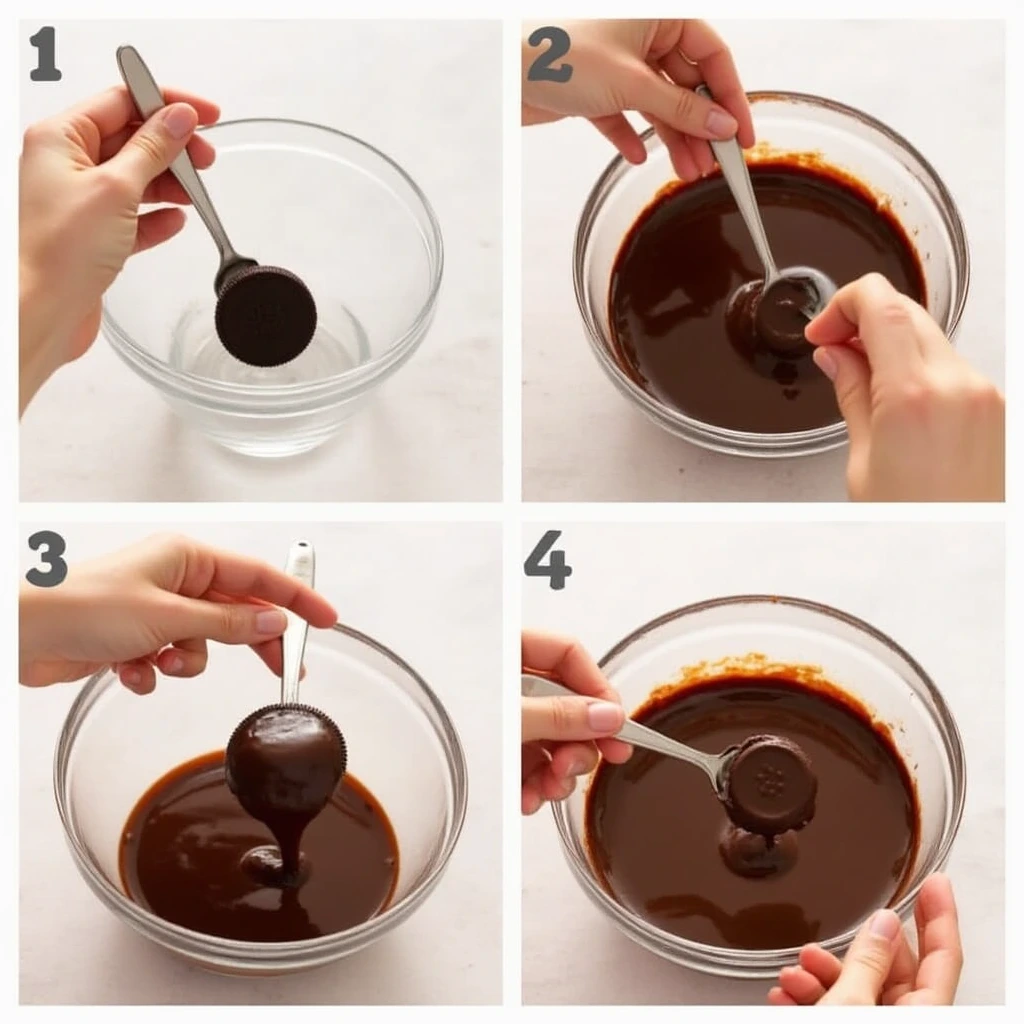
Dipping the Oreos into the melted chocolate is the most exciting part! Here’s a simple step-by-step guide to help you coat the Oreos perfectly:
How to Dip:
- Please pick up the Oreo: Gently hold the Oreo by its sides or use a fork to avoid getting chocolate on your fingers.
- Dip the Oreo: Submerge the Oreo into the melted chocolate, making sure it’s fully coated.
- Remove the Oreo: Lift the Oreo out of the chocolate using the fork or your fingers. Tap the fork gently on the edge of the bowl to remove any excess chocolate.
- Place on parchment paper: Place the dipped Oreo onto the prepared paper, ensuring it is flat. Repeat this process for all your Oreos.
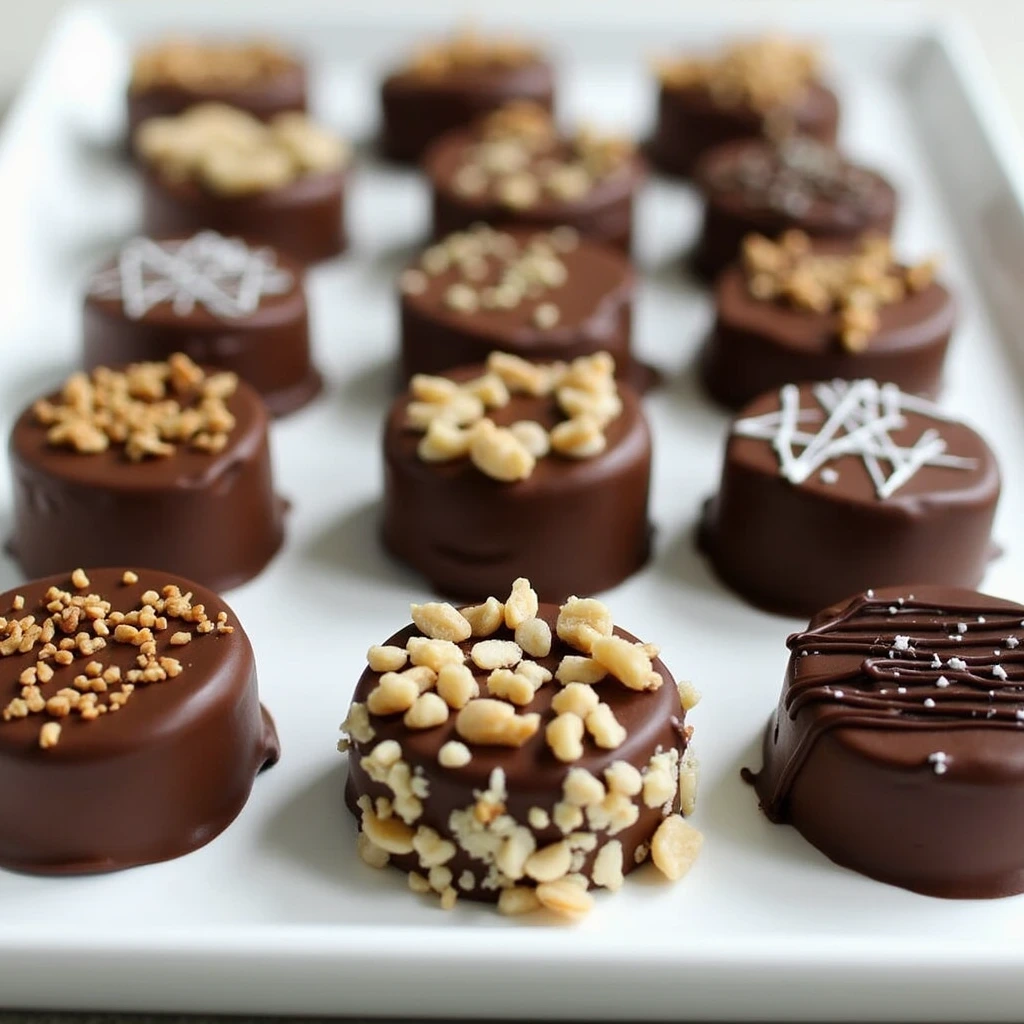
Adding Toppings:
If you want to add flair to your chocolate-covered Oreos, now’s the time. Before the chocolate sets, sprinkle your desired toppings like:
- Rainbow sprinkles
- Chopped nuts (like almonds or pistachios)
- Crushed candy or cookies
- Drizzled chocolate (dark or white)
Once you’ve dipped and decorated all your Oreos, it’s time to let them set.
Step 5: Let the Chocolate Set
After dipping, the chocolate-covered Oreos need to cool and harden so they don’t smudge when you handle them. There are two methods for setting your cookies: room temperature and refrigeration.
Setting at Room Temperature:
- Let the Oreos sit: The cookies should sit on the parchment paper for 20-30 minutes at room temperature. The chocolate will gradually harden as it cools.
- Check for firmness: Gently touch the chocolate to check if it has set. If it’s firm and not sticky, your chocolate-covered Oreos are ready to enjoy!
Speeding up the process (optional):
If you’re in a rush or can’t wait to taste your creation, you can speed up the process by refrigerating the cookies:
- Place in the fridge: Place the tray with the Oreos in the refrigerator for 10-15 minutes.
- Check the chocolate: Once it is firm, remove the Oreos from the fridge and let them sit at room temperature for a minute before serving.
Once the chocolate is set, your homemade chocolate-covered Oreos are ready to enjoy!
Storing Your Chocolate-Covered Oreos
Homemade chocolate-covered Oreos are stored at room temperature and are best eaten within a week. However, if you want to store them for longer, you can keep them in an airtight container in the refrigerator for up to two weeks. Insert parchment paper between the layers to keep them from sticking.
Tips for Perfect Chocolate-Covered Oreos
- Choose High-Quality Chocolate: High-quality chocolate will elevate the taste and texture of your chocolate-covered Oreos. It’s worth investing in good-quality chocolate for the best flavor.
- Don’t Rush the Cooling: Allow the chocolate to cool completely before handling the Oreos. Rushing this step can cause the chocolate to smudge.
- Be Creative: Add your twist by using different flavored Oreos or experimenting with toppings. The possibilities are endless!
- Make a Double Batch: Chocolate-covered Oreos are so popular that you can make extra. They also make wonderful gifts for friends and family!
FAQs
How long does it take for chocolate-covered Oreos to set?
It usually takes about 20-30 minutes for chocolate-covered Oreos to set at room temperature. If you’re in a hurry, you can place them in the fridge for 10-15 minutes.
Can I use white chocolate for dipping Oreos?
Yes, white chocolate works great for dipping Oreos! It’s creamy and sweet, and it complements the Oreo’s flavor beautifully.
Can I store chocolate-covered Oreos in the fridge?
Yes, chocolate-covered Oreos can be stored in an airtight container in the fridge for up to two weeks.
Making chocolate-covered Oreos at home is a fun and delicious way to indulge in a sweet treat. With just a few simple ingredients and five easy steps, you can create professional-quality chocolate-covered Oreos that will wow your family and friends. Don’t forget to get creative with different chocolate flavors and toppings to make these treats your own!
Now that you know how to make them, it’s time to gather your ingredients and start dipping. Enjoy!
Did You Try Our Recipe?
There are no reviews yet. Be the first one to write one.