
Grandma’s Vintage Cakes
Table of Contents
Table of Contents
Have you ever closed your eyes while taking a bite of cake and suddenly found yourself transported back to grandma’s kitchen? That distinct flavor, that perfect texture – there’s something about vintage cakes that modern recipes just can’t replicate. The kitchen filled with the sweet aroma of butter and vanilla, the familiar sound of a wooden spoon against a ceramic bowl, and the anticipation of that first heavenly bite of grandma’s perfect cake. These vintage cake recipes carry more than just ingredients—they hold stories, traditions, and a special kind of magic that modern box mixes simply can’t capture.

Today, we’re unlocking the secrets behind those cherished vintage cakes that made our grandmothers legendary bakers in their time. You’ll discover not just how to follow old recipes, but how to truly understand and recreate that vintage cake magic in your modern kitchen.
The Lost Art of Vintage Cake Baking
Before food processors, stand mixers, and boxed cake mixes became kitchen staples, cake baking was considered an art form that required patience, precision, and practiced hands. Your grandmother didn’t just follow recipes—she understood the science behind them, often without realizing it.
In the golden era of home baking (roughly 1920s-1960s), recipes were passed down through generations, often with little notes and secrets scribbled in the margins. Women took pride in their signature cakes, which often became the centerpiece of family gatherings and community events. A perfect cake wasn’t just food—it was a statement of care and craftsmanship.
What makes vintage cake techniques so different from modern shortcuts? For one, they relied on meticulous attention to detail rather than convenience. Before electric mixers became commonplace, achieving the perfect “cream” of butter and sugar required serious elbow grease and up to 15 minutes of continuous stirring. The payoff? A light, airy cake with incomparable texture.

Essential Tools for Authentic Vintage Cake Baking
To truly capture the essence of grandma’s baking, you might want to consider using some traditional equipment. While modern alternatives can work, certain vintage tools were designed specifically for the techniques that made those cakes so special.
Must-Have Vintage Baking Equipment:
- Heavy-duty stand mixer or hand-cranked beater – The slow, consistent action of vintage beaters incorporated air differently than modern high-speed mixers
- Sifter for flour – An absolute necessity for achieving that fine, light texture
- Ceramic mixing bowls – These maintain an even temperature better than metal bowls
- Wooden spoons – For gentle folding and mixing without deflating batters
- Cast iron or heavy aluminum baking pans – These conduct heat evenly for perfect cakes
- Pastry cloth – For rolling out certain cake layers without sticking
- Vintage cake carriers – Not just for transportation, these allowed cakes to rest properly

No need to stress if you don’t have every vintage item on hand. Modern alternatives can still deliver authentic results if you understand the principles behind them. Look for heavy-bottomed baking pans, invest in a quality stand mixer with multiple speeds, and always have a good sifter on hand.
You’d be surprised at what treasures you might find at antique shops, estate sales, and online marketplaces like Etsy or eBay. Many vintage baking tools were built to last generations and still perform beautifully today.

The Science Behind Vintage Cake Success
Understanding the science behind vintage baking techniques will transform your results from merely following an old recipe to truly recreating grandma’s magic.
Room temperature ingredients weren’t just a preference—they were essential. Cold butter doesn’t trap air properly during creaming, and cold eggs can cause batters to curdle. Your grandmother knew to set these ingredients out hours before baking began.
Have you ever wondered why vintage cake recipes often called for sifting flour multiple times? This wasn’t fussy overkill—it served important purposes. First, flour in earlier decades was less consistent and often contained impurities that needed removing. Second, sifting incorporated air into the flour, creating a lighter texture. And third, it ensured even distribution of leavening agents like baking powder.
Mastering the creaming method—just like grandmothers did—is perhaps the most essential step in achieving that perfect cake texture. When you cream butter and sugar together until truly light and fluffy (which takes much longer than most modern bakers realize), you’re creating millions of tiny air pockets. These expand during baking, giving vintage cakes their signature tender crumb and volume.

Ingredient Swaps for Modern Bakers
Today’s ingredients aren’t quite the same as those your grandmother used. Here’s how to adapt:
| Vintage Ingredient | Modern Equivalent | Notes |
|---|---|---|
| Cake flour | All-purpose flour + cornstarch | Use 2 Tbsp cornstarch per cup of flour |
| Buttermilk | Milk + lemon juice/vinegar | 1 Tbsp acid per cup of milk |
| Lard | Butter or shortening | Butter adds flavor, shortening adds texture |
| Cane sugar | Granulated sugar | Slightly different crystal size |
| Fresh vanilla | Vanilla extract | Use premium extract for best results |
| Fresh cream | Heavy whipping cream | Avoid ultra-pasteurized for best results |
3 Classic Vintage Cake Recipes Decoded
Let’s put these principles into practice with three classic vintage cake recipes that showcase different techniques and flavors that made grandma’s baking so special.

1. Grandma’s Perfect Yellow Cake
This cornerstone of vintage baking is deceptively simple but requires attention to detail for that melt-in-your-mouth texture.
Ingredients:
| Ingredients | Quantity | Notes |
|---|---|---|
| Cake flour | 2½ cups | Sifted 3 times |
| Baking powder | 2½ tsp | Aluminum-free if possible |
| Salt | ½ tsp | Fine sea salt preferred |
| Unsalted butter | 1 cup | Room temperature |
| Sugar | 2 cups | Superfine if available |
| Vanilla extract | 2 tsp | Pure, not imitation |
| Eggs | 4 | Room temperature |
| Whole milk | 1 cup | Room temperature |
Steps:
- Preheat your oven to 350°F (175°C). Prepare two 9-inch round cake pans by greasing them thoroughly, lining the bottoms with parchment paper, then greasing again and dusting with flour.
- Sift the cake flour three times to ensure a light, airy texture. After the final sift, whisk in the baking powder and salt until fully combined.
- In a large bowl, beat the butter with a wooden spoon or a mixer on low speed until it becomes smooth and creamy—this should take about 1 minute.
- Gradually add sugar to the butter (about 1/4 cup at a time), beating thoroughly after each addition. Continue beating for 7 to 10 minutes until the mixture is light and fluffy. This extended creaming is crucial!
- Add vanilla extract and mix well.
- Incorporate the eggs one by one, ensuring to beat the mixture for a full minute after each addition. The mixture should look smooth and satiny.
- Slowly incorporate the flour mixture into the butter mixture in three stages, alternating with the milk. Begin and end with the flour. Blend on low speed until each addition is just incorporated.
- Use a rubber spatula to gently fold the batter a few times, ensuring everything is incorporated without overmixing.
- Distribute the batter evenly between the prepared pans, leveling the tops with a spatula.
- Bake on the middle rack for 25–30 minutes, or until a toothpick inserted into the center of the cake emerges clean and crumb-free.
- Let the cakes cool in their pans for exactly 10 minutes, then carefully turn them out onto wire racks to cool completely before applying any frosting.
Testing for Doneness the Vintage Way:
Your grandmother likely didn’t rely on toothpicks. The vintage way to test cake doneness included:
- You’re looking for the cake to gently pull away from the sides of the pan—a classic sign it’s perfectly baked and ready to come out of the oven.
- Gently pressing the center with a finger, it should spring back
- Listening to the cake—a done cake is quiet, while an underdone cake may still make slight bubbling sounds
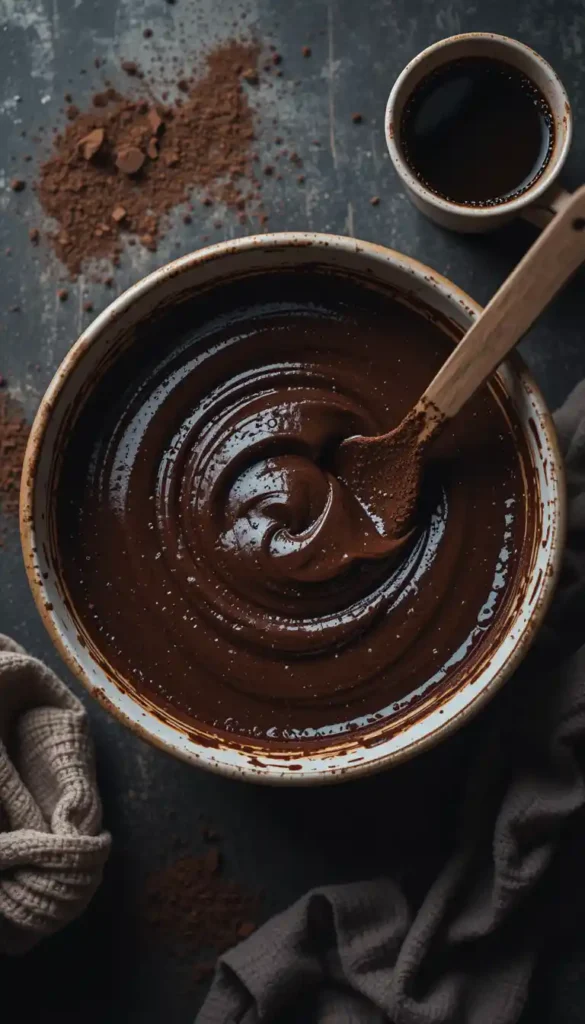
2. Classic Devil’s Food Cake
This intensely chocolate cake was a staple in vintage recipe boxes, known for its deep flavor and tender crumb.
Ingredients:
| Ingredients | Quantity | Notes |
|---|---|---|
| All-purpose flour | 2 cups | Sifted twice |
| Baking soda | 1 tsp | Fresh is essential |
| Baking powder | 1 tsp | Aluminum-free preferred |
| Salt | ½ tsp | Fine sea salt |
| Unsweetened cocoa powder | ¾ cup | Dutch-process for darker color |
| Hot strong coffee | 1 cup | Freshly brewed |
| Unsalted butter | ½ cup | Room temperature |
| Sugar | 2 cups | Granulated |
| Vanilla extract | 2 tsp | Pure, not imitation |
| Eggs | 3 | Room temperature |
| Buttermilk | 1 cup | Room temperature |
The secret to that deep chocolate flavor in vintage devil’s food cake? Hot coffee! Your grandmother knew that heat blooms cocoa’s flavor compounds, while coffee enhances chocolate without adding a coffee taste. Modern recipes often skip this crucial step, resulting in less complex flavor.
When preparing chocolate cakes, vintage bakers used a different pan preparation method: greasing the pan, then dusting with cocoa powder instead of flour, prevents those unattractive white streaks on the dark cake’s exterior.
3. Heirloom Spice Cake
Spice cakes varied dramatically by region and family tradition, but they all shared a complex, aromatic profile that made them perfect for special occasions.

The key to exceptional spice cake lies in balancing warm spices so none overwhelms the others. Your grandmother likely had strong opinions about which spices belonged in her signature recipe! Regional variations are fascinating: Southern spice cakes often feature nuts and dried fruits, New England versions might include molasses, and Midwestern recipes sometimes incorporate applesauce or grated apples.
Always use fresh spices for authentic results—the pre-ground spices that have been sitting in your cabinet for years simply won’t deliver the aromatic punch that made vintage spice cakes so memorable.
Vintage Frosting Techniques That Make All the Difference
Modern frostings tend to focus on simplicity and sweetness, but vintage frostings were an art form all their own.
Cooked Frostings: The Vintage Standard
Before reliable refrigeration, cooked frostings reigned supreme because they were more stable at room temperature.
Classic Cooked Frosting Types:
- Seven-minute frosting – A marshmallow-like, glossy white frosting made by beating egg whites, sugar, and corn syrup over simmering water
- Boiled milk frosting (Ermine) – A butter roux-based frosting with a silky texture that was the original pairing for red velvet cake
- Caramel frosting – Made by carefully caramelizing sugar before incorporating it into a buttercream base
- Old-fashioned chocolate fudge frosting – Essentially fudge in spreadable form, with a slight crust that forms as it sets
The technique for smooth, lump-free cooked frostings requires patience and attention. Use a heavy-bottomed saucepan to prevent scorching, and don’t rush the cooking process. For seven-minute frosting, continuous beating while cooking is crucial—your grandmother’s aching arm wasn’t just for show!

Decorating Styles of Yesteryear
Vintage cake decorating emphasized understated elegance over elaborate designs. Before plastic piping bags, bakers used waxed paper cones for simple shell borders and rosettes. Your grandmother likely followed the “less is more” aesthetic, with perhaps a ring of piped details and a simple message.
Natural food colorings derived from fruit juices, tea, and vegetable extracts created the subtle, soft hues characteristic of vintage cakes—a far cry from today’s vivid artificial colors.
The Secret Touches That Made Grandma’s Cakes Special
Beyond following recipes precisely, grandmothers incorporated small touches that elevated their cakes from good to unforgettable:
A splash of almond extract (just 1/4 teaspoon) added complexity to vanilla cakes without being detectable as almond.
Proper cake storage was an art form—many vintage recipes specify covering cakes with a dish towel rather than plastic wrap to allow the cake to breathe while preventing it from drying out.
The practice of allowing cakes to “rest” before serving—often overnight—allowed flavors to meld and textures to stabilize. This patience produced noticeably better results, especially for spice cakes and fruitcakes.
Simple syrups brushed on layers before frosting was a professional baker’s trick that many home bakers adopted. This added moisture and subtle complementary flavors.
Common Mistakes When Recreating Vintage Cakes
Pitfalls to Avoid:
- Rushing the creaming process – Those 7-10 minutes of creaming butter and sugar create the foundation for proper texture
- Skipping the sifting steps – Each sift serves a purpose for texture and ingredient distribution
- Using cold ingredients – Room temperature isn’t optional—it’s essential chemistry
- Opening the oven door too early – This causes dramatic temperature fluctuations that lead to fallen cakes
- Not adjusting for modern ovens – Today’s ovens heat differently; you may need to reduce the temperature by 25°F
- Using the wrong pan size – Vintage recipes often called for smaller pans than we typically use today
- Over-mixing the batter – Once flour is added, minimal mixing prevents gluten development and tough cakes
Modern convection ovens circulate heat differently than vintage conventional ovens. When using convection for vintage recipes, reduce the temperature by 25°F and check for doneness earlier than the recipe states.
Understanding vintage measurements can be tricky—a “teacup” of sugar isn’t the same as a modern measuring cup. Generally, a teacup measured about 3/4 of a standard cup, while a “pinch” was about 1/8 teaspoon, and a “dash” was about 1/16 teaspoon.
Recipe Details
- Prep Time: 30 minutes
- Cook Time: 30 minutes
- Total Time: 1 hour (plus cooling time)
- Servings: 12
- Calories: 320 per slice
Nutrition Information (per serving)
- Calories: 320
- Fat: 16g
- Saturated Fat: 9g
- Protein: 4g
- Carbohydrates: 42g
- Sugar: 28g
- Fiber: 0.5g
- Sodium: 150mg
- Cholesterol: 105mg
Recipe Categories
- Course: Dessert
- Cuisine: American
- Diet: Vegetarian
- Method: Baking
- Keywords: vintage cake, yellow cake, grandmother’s recipe, classic baking
- Skill Level: Intermediate
Conclusion
Recreating your grandmother’s vintage cake magic isn’t just about following a recipe—it’s about embracing a slower, more intentional approach to baking. These time-honored techniques connect you to your past while creating new memories for future generations. The next time you’re tempted to reach for a box mix, remember that the extra effort of a scratch-made vintage cake brings rewards that go far beyond taste. They bring back the magic, the memories, and maybe even a bit of grandma’s love in every slice.
Baking these vintage cakes isn’t merely about nostalgia—it’s about preserving valuable culinary traditions that might otherwise be lost to time. By understanding not just the what but the why behind these techniques, you become part of a long line of bakers who have created moments of joy and connection through something as seemingly simple as cake.
Why not pull out that handwritten recipe card or vintage cookbook this weekend? Take your time, follow the principles you’ve learned here, and experience the satisfaction of creating something truly special, just like grandma used to make.

Frequently Asked Questions About Vintage Cake Baking
Q: Why do vintage cake recipes call for sifting flour multiple times?
A: Multiple siftings in vintage cake recipes aerate the flour, creating a lighter, finer texture that was essential when flour was less processed and often contained more impurities.
Q: Can I use modern equipment instead of vintage tools for these recipes?
A: Yes, but understand that some modern equipment works differently. Stand mixers are faster than hand mixers, so be careful not to overmix. The key is respecting the underlying techniques.
Q: Why did Grandma’s vintage cake taste better than mine, even though I’m using her exact recipe?
A: Ingredients have changed over time. Modern flour has different protein content, eggs may be smaller, and butter often contains less butterfat. Try sourcing higher-quality, less processed ingredients for results closer to grandma’s original.
Q: Do I need to have ingredients at room temperature?
A: Absolutely! This was a non-negotiable in vintage cake baking. Room temperature ingredients incorporate air better during creaming, creating that signature tender crumb.
Q: How long should I cream butter and sugar for a vintage cake recipe?
A: Much longer than you think! Grandmothers often creamed for 7-10 minutes until truly light and fluffy. This creates the structure that helps the cake rise properly.
Q: Can vintage recipes be adapted for dietary restrictions like gluten-free or vegan?
A: Yes, but expect to experiment. The science of vintage cake baking relies on certain chemical reactions between traditional ingredients, so substitutions may require additional adjustments to achieve similar results.

Ready to Bring Back the Magic of Grandma’s Baking?
Now that you’ve discovered the secrets behind those cherished vintage cakes, it’s time to dust off those mixing bowls and create some magic in your kitchen! Don’t just read about these techniques—experience the satisfaction of pulling a perfectly risen yellow cake from the oven, just like grandma used to make.
Did you try one of these vintage cake recipes? Share your baking journey in the comments below! We’d love to see your creations and hear about any family recipes you’ve rescued from forgotten recipe boxes. Don’t forget to rate this recipe if it brought back sweet memories of your own grandmother’s baking.
Looking for more nostalgic recipes? Check out our other vintage dessert recreations:
Never miss a recipe! Subscribe to our weekly newsletter for more time-tested family recipes and baking techniques delivered straight to your inbox; follow us on social media. Or follow us on Instagram @VintageBakingMagic for daily inspiration and behind-the-scenes looks at our test kitchen.
Happy baking, and remember—sometimes the old ways are the best!
Did You Try Our Recipe?
There are no reviews yet. Be the first one to write one.